Showing posts with label Science. Show all posts

Tuesday, June 4, 2013

Identity Crises Leads to Ziploc Bag Ice Cream!

Man!  It has been a long time since I've posted!

School is out for summer.  The sun is shining and the pool is crystal clear and cool.  And I've been INSIDE trying to redo my blog.  Yep.  Stop and Smell the .... Children was catchy, but it wasn't a solid fit.  Every time I would come to write, it just didn't seem to sit well with me.

So I stopped writing, but now I'm back and with a clearer focus.  I love all things elementary.  Kids' books-got to have them.  Pictures of classrooms- a whole pinterest board.  Crayolas and Elmers- check!  But my heart always has beat to the drum of science.  So an elementary teaching blog with an emphasis on science!  I'm set!

This past year, I started a science club at my school.  We are a 2nd and 3rd grade school with about 450 students.  I was super excited to see 65 kids sign up.  My goal was to make the science hands-on and messy!  We met once a month and I was important for me that they be able to tell me the science reasoning behind whatever experiment, etc that we did before they got in their cars to go home.  We had a blast!

September - Box Turtles Visit the Classroom
October- What Did Your Owl Eat?
November- Field trip!  Recycling!
December- Electricity for the Christmas Tree
January- It Holds More?!?!  A Volume Tale
February- Homemade Star Lab
March- Plant a Garden, Watch it Grow
April- Ziploc Ice Cream

Which of these do I need right about now?  Ice Cream!


If you have never made ice cream in a ziploc bag, it is a must do!  So simple!

First of all,  kids are amazed that they don't need a machine to make ice cream!  Three ingredients, plus salt, plus ice!  Let's go!

Give each kid two ziploc bags (1 sandwich size and 1quart or gallon size)

Inside the small bag, put 1 tablespoon sugar, 1/2 cup milk, and 1/4 teaspoon vanilla.


Zip the bag up tight!  Put it inside of the larger bag.  Add 3 hand fulls of ice and about 1/3 cup of salt to the larger bag.  Zip it up!  Almost to yummy coldness!


Have the kids mash, mix, twirl, and poke their bags until they see that their liquid milk is looking kind of mushy.  Keep going!  This will take about 10 minutes or so and they are going to fuss that their fingers are soooo cold!  (Hmmmm.... science moment here!)


After my kids got their bags to a good, thicker than milkshake consistency, we pulled out the spoons and the chocolate syrup!  Yummy!

Now it's fun to make, tasty to eat, and interesting to learn how it froze.  I mean, we add milk to drinks all the time and they don't freeze.  Hmmm.....  Check out this youtube video to see ScienceOnTheBrain's experiment with melting ice and adding salt. 

The temperature of a melting ice cube will steadily increase to around 31 or 32 degrees Fahrenheit, give or take and then it will hang around that temperature for awhile.  Milk will not freeze at 32 degrees, so we add salt.  This brings the freezing point of the water down low enough for the thermal energy that is in the milk to flow out towards the freezing water.  Once enough of the thermal energy has left the milk recipe, it will freeze, making ice cream!


Super easy!  Super cheap!  Super yummy!

Try it this summer!  Now I'm off to sit by the pool and read my book (with a bag of ice cream)!


Wednesday, January 30, 2013

Magnets Experiments!


Just finished our magnets unit!  Check out some of our experiments and activities:
Most are quick and easy!


Horseshoe War!  We battle these horseshoe magnets to be sure students understand the difference between not attracting and repelling!  Like poles will repel-- Magnets and wood do not attract or repel!


How to Make a Temporary Magnet
See My earlier post for pictures, directions and teaching tips/tools for how to make a temporary magnet!


Trick Magnets
Head to your nearest Dollar Tree!
$1 for a set of these super cool trick magnets!  They amaze the kids when they attract through your hand.  Hide one on the back of your clipboard, and just start sliding it around.  Shh... as they notice the other magnet magically sliding around, they grin!


Floating Paperclip!
See this post for a super exciting, quick and very little work experiment on magnetic field!


Magnet Race
Review attract and repel by putting colored stickers on the poles of your magnets, so students can identify north and north and south and south.  Use one magnet to repel-without touching- the other magnet to the opposite side of the tray!  First one there is the Winner!  Get too close to the magnet's pair?  They will attract and you have to start over!  The race is on!  Place cards beside the tray that read "attract" and "repel" so the kiddos know to use these words as they are describing the experience!  They hardly know they are learning!


Floating magnets!
Don't have this display model?
Stick a pencil through several ceramic magnets with their like poles facing.  They float!  Students do a great job of explaining why this happens!  Review magnetic field by pulling the magnets away from each other?  Why do they no longer repel or attract?


Magnetic Field Models
Worth every penny!  Buy these!  I've tried pouring iron filings onto a glass picture frame--- What a mess!  These little kits are super easy for clean up and are safe for the kids to use themselves.  Hand them two magnets and have them describe how attract looks different from repel!  Why????


Compass!
Draw a map... you know some triangle mountains, snake like rivers and Christmas trees.  Slap a winding path through the middle and discuss what happens when a hiker gets lost.  How do you find your way out?  Why would a compass be helpful?  What does a magnet do to a compass?  What does a large iron object do to a compass?  How does it work?  Great activator!

Attract/Won't Attract Experiment 
Place various items in tubs and allow students to test them.  I always put different types of metals in mine!  It throws them off every time!  Especially the penny!  Try an aluminum can!
Recording sheet is FREE at my TpT store!

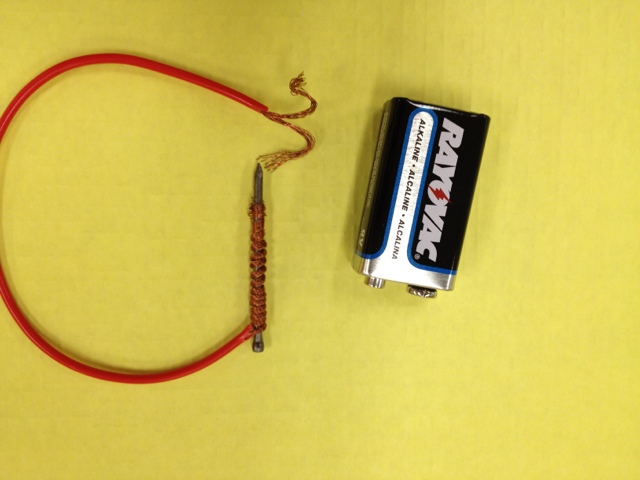
How to Make an Electromagnet:
materials- copper wire, nail, 9 volt battery
Coil the wire around the nail like this and hold the other end to the terminals of the battery.  It won't be very strong, but it will certainly attract a few spent staples- just enough to AMAZE the kids!


For me, experiments catch their attention, but they need the vocabulary in print!  Check out my word wall words, vocabulary matching sets, dominoes for vocabulary.


Vocabulary review with these awesome, kid friendly foldables (available at my TpT Store)

Check out my TpT store, Tab Purvis, for my vocabulary bundle, review game and most popular- magnets minibook!


Happy Experimenting!
Tab

Penguin Videos and Webcam!

Who likes penguins?  Me!!!  (and every kid in my class!)  We've been working on Mr. Popper's Penguins and the kids are beginning an informational writing piece this month.  I love that every ability level can find success with this topic.  One of my students impressed me after watching one of these clips when he asked if this was a rookery.  Rookery?!?  Awesome!  He's using the vocabulary from our unit!  So proud! 

These videos are short and sweet.  The content is appropriate for school and I've embedded the videos- so for all my not-so-tech-savy friends, you don't have to worry about crazy side banners popping up when you pull up youtube.  These videos are written into the page so you dont have to worry about surprises!

My kids loved these penguin videos!  They are produced by BBC and Discovery. 

Happy penguin watching!
Tab


Birth and March of the Emperor Penguins


Penguins launch like rockets from the water.


Emperor Penguin vs. Sea Leopard BBC


Emperor Penguins - The Greatest Wildlife Show on Earth - BBC
Penguin Webcam | SeaWorld San Diego

Sunday, January 27, 2013

Top FREE Apps for Elementary Science Teachers


Teach Science?  Want some cool interactive and FREE apps to use?  Check these out!  The last one is my latest discovery and I'm fascinated with it!  I can't wait until I teach animal adaptations for birds' beaks!  This will be perfect!


Dinosaur:  American Museum of Natural History

Take your class on a virtual fieldtrip to this museum!  See tons of dinosaur fossils and find out about their history.  Boys will surely become young paleontologists as they love digging through this collection.  My favorite:  Styracosaurus albertensis from Red Deer River region in Alberta, Canada, about 75 million years old! discovered in 1915. 
I had the opportunity last summer to visit the Natural History Museum for Children in London and was completely AMAZED to see real fossils!  This small town gal had never seen anything remotely like it.  It made me realize that if I hadn't, my kids certainly had not!  Since I can't pack them up and Miss Frizzle them up to Washington, D.C. from Georgia... this is the next best thing!


Google Earth

Wow!  Begin by seeing the entire world and zoom little by little all the way down to the front door of your school!  Crazy!  (Check out your own driveway, too!)  Super cool way to teach geography and scale!
I can stop trying to layer pictures of the United States, Georgia and our hometown into some -not so convincing graphic- production to try to get them to visualize the scale!  This is SO much better!


My newest fav!
Wildlab Bird
I've only used the preview mode and it is loaded with fancy options!  Begin by choosing your habitat- woodland, coastal, wetland or grassland and then select a structure style- such as:  owl-like, hawk-like, heron-like, etc.  Pictures of SOOOOO many birds pop up and you can even hear recordings of their calls and see their locations mapped out! 
My husband's a duck hunter and our little one year old girl walks around saying "duck" all the time!  She was just as amazed as I was with the sounds and pictures!  Quack, Quack!


Wednesday, January 16, 2013

How to Put Together My Magnet Minibook!

So I've had several people ask...

Here's the trick for putting together the magnet minibook!

I hope the step by step pictures help you out. If not, leave me a comment and I'll get back with you ASAP.

For those who haven't seen my magnets minibook, it's available on my TpT store. It covers types of magnets, objects that are and are not attracted, magnetic and nonmagnetic metals, magnetic fields, electromagnets, and more!

The bag doubles as a keeper for your vocabulary cards! Pictures and artwork extend student understanding! 24 pages with space for students to include their own responses :)

Hope your kids love it as much as mine do!


Pollution Experiment: Black Banana Week 2 and Oil Spill Experiment

Check out week 2’s picture of our decomposing banana. 


The kiddos made a list of factors that occur outside that are affecting the decomposition rate.  Topping the list:  rain, ants and temperature. 

I haven’t generated a conversation about how or why these things could affect decomposition yet.  Instead, we began tracking a rotting banana that we are keeping inside to compare to the one outside.  They liked to poke their fingers in it during the first week, but now that it’s oozing rotten juice, they steer clear!

I can’t wait to have them compare these two bananas in a couple more weeks.  I plan to post specific vocabulary (decompose, rot, and compost) beside the bananas so they can remember to use the words when they are describing what they see.  I’m a HUGE believer in posting word walls so those visual kids can see and hear the words!

For those I Hate Science Teachers—if you can’t stand the idea of having a rotting banana in the back of your class, show the kiddos these pictures and have them compare and draw conclusions.  Better than nothing!


OIL SPILL

I googled oil spill in the Gulf of Mexico and showed the class a few pictures of oil slathered pelicans, fish, crabs, etc.  The room was silenced by the graphic pictures of animals in distress.  We discussed how the quality of life had changed, food web destroyed, habitats damaged, etc.  I like for my kids to verbalize that pollution doesn’t just kill; it also diminishes the livelihood of animals. 
$1.88- buy some brightly colored feathers at Walmart
Kitchen cabinet- cooking oil
Closet- old tshirts

Super easy experiment- 
After realizing the damage that oil has on animals and their habitats, pass a feather to each student and drizzle oil on one of their hands.  Have them cover the feather with the oil.  I challenge mine to try to remove the oil.  Of course they can’t.  Have them try to not use their thumbs, because, of course, birds don’t have thumbs.  When they give up, pass out the soap.  Old tshirts?  Save the environment one paper towel at a time!  Use an old tshirt as a hand towel!  My kids think I’m crazy for it, but I bet they’ll remember it for a long time!
Begin a discussion on how these animals in the Gulf of Mexico had no possibility of cleaning themselves from a disastrous mistake make by humans.  They enjoyed the experiment and really get the concept of how humans are affecting ocean ecosystems. 
Thoughts for next time:  put food coloring in the oil so it’s easier to see, put the oil and feather in a bowl of water and have them try to also remove the oil from the water.  This wouldn’t take much more on the setup end, but it would extend the experiment to specifically include effects on the habitat and animal.


Much thanks to my mom, who always thinks out of the box, says no to nothing, and inspired me to be a science teacher,
Tab


Tuesday, January 15, 2013

Where Did the Water Go?: All About Soils


So as you know, I teach 3rd grade in the great state of Georgia. Types of soils is one of our science standards. Being that I taught my Earth Science unit in August and September, I decided last week was a good time to review. In my room, we do centers every Thursday. This means small group experiments, review, and just general hands on, concrete learning for either our current unit or to refresh an old one.
I found The Science Penguin's TpT Store when I did a general search for soils experiments. Ari's FREE experiment was perfect!

Disclaimer: In no way do I benefit from The Science Penguin for this blog. I was so impressed by the ease of the experiment, the way the kids understood the concept and the overall experience. I wanted to share it with you all!

To the good stuff:
Start out by downloading the activity from TpT and making copies of the recording sheet. Pull out 4 funnels, graduated cylinders, petire dishes and coffee filters. Grab your sand, loam, clay and gravel. I got my gravel from a bag for the fish tank! Use what you have, right?

Set up the experiment like this:


Next measure 40 mL of water to pour into each graduated cylinder. I put food coloring in mine, so it would be easier for the kiddos to see. Step them through the logic: If 40 mL goes in, and 38 mL comes out, where is the other 2 mL? Is this addition, subtraction, multiplication or division?

Repeat for all 4 cylinders. Alright!! Never TELL them again that clay holds water better than sand.  Let them SEE it! Even my low kids were having those Ah-Haa moments!

I did the experiment as a whole group, per the directions of Ari @ The Science Penguin, and left the recording sheet for the kiddos to do when they came to that center. Easy as can be!

After doing this experiment, the only thing I would add is to write labels for each of the types of soil. I like to incorporate written language to catch those linguistic and visual learners! Words to consider: gravel, sand, clay, loam, retain, funnel, graduated cylinder
 E.A.S.Y.


I passed out the recording sheet the next day to be sure that each student had completed it correctly and to review the conclusions that were drawn. Next Thursday, I'm going to bring in some grass seed and see if we can get them to grow in each type of soil. Put these two concepts together and tadaaa! Mission accomplished! Thanks, Ari @ The Science Penguin! I look forward to using your experiments again!

Visit her TpT Store for tons of cool experiments and definitely check out her Science Weekly Five activities!

Tab

Tuesday, January 8, 2013

Pollution, Week 1 with a Black Banana

So we started our pollution and conservation unit before Christmas. The kiddos did a fabulous job figuring out ways to conserve energy and water, reuse common items and prevent pollution. So why did they bomb the test?
Short answer- excellent
Multiple choice- 40s and 50s
Hmmm...
That's backwards.
I spent a great deal of time writing that exam. Scrutinizing the depth of knowledge for each question. Maybe it was plain and simple. Two days before Christmas break, we rested. Probably not my finest idea!
Well, we're spending a few minutes each week reviewing and all out reteaching these standards.
Ever have that problem? A whole unit that needs redelivery?
Well, today we focused on decomposition and composting. We took a two week old rotten banana which we held on to from pre- Christmas, and the kids discussed factors affecting the rate of decomposition. Next they made a list of ways to speed up that rate. Water, bugs, and natural elements topped the list. I then had them design their strategy for how and where to place it outside on our playground.

It was a beautiful sight to see, them flying to the far corner of the playground at the end of today to check on their experiment. Notice I said THEIR and not our. Think of how much pride they gained and confidence in science just because they designed the experiment themselves. Maybe we teachers should give up a little more power more often... Food for thought!
Tab

Friday, December 28, 2012

Reindeer adaptations!

When we get back from Christmas and the winter weather gets cold in Georgia, my students and I will work on animal adaptations. Since they like reindeer so much, we're going to google reindeer images and discover the features that help reindeer to thrive. Head over to my TpT store and print a reindeer template and a set of adaptation cards to summarize their adaptations!
Such a fun way to get the kiddos back into that learning groove! Happy holidays!

Tuesday, December 18, 2012

Pollution websties

Pollution!!

If you ever teach pollution, I have two must visit websites.
When you ask your students what effect pollution has on animals, I bet you get the same response I get. "They die."  wow..... shocker!  This 1st website helps kids to see that death is not the only effect.

This 1st one REALLY hooks the kids' interest.  After introducing air, land, and water pollution, I show the kids the following website that contains pictures of deformed frogs.  Allow them time to deduce what is likely causing the abnormalities.  They won't forget this lesson.  Even in April and May, the kids readily recollect these frogs and how their habitat was changed by pollution.  Basically, in 1995, some students in Minnesota began to find deformed frogs in the local wetland areas, and that's when a small research project began.  It grew very large, even getting funding from their state legislature.  The scientist took water samples and frog eggs and began to try to grow the eggs with the water samples.  This led to the conclusion that the water was polluted; however, their state cut the funding in 2001 and the website reports no official pollutant as the cause.

http://www.pca.state.mn.us/index.php/living-green/living-green-citizen/for-kids/deformed-frogs/photographs-of-deformed-frogs.html

The 2nd is all about composting.  Vermi the Worm is an animated earthworm who walks the students through a recycling skit, a performance about what makes a good comport bin, an experiment using compost and a few sorting games for composting, recycling, reducing and reusing.  Interactive and highly engaging!

http://www.calrecycle.ca.gov/Vermi/Game/menu.html


Enjoy!
Tab

Leapin' Lizards!!!

It all started when I FORGOT to bring an old rotting log...

I introduced decomposing today as part of my pollution/conservation unit, and I wanted to bring in an old, rotting log to hook the kids' attention.  Great idea!  Until I forgot to go out back and get a stinky, old stick.  So there has to be some at school... This is what went through my brain until I got there and saw that of course the grounds crew had just visited our elementary school.  Just my luck! 
We have a small garden area, so I settled for some rotting leaves and a couple of rotting root stalks. 
Jack pot!!!!

Five minutes til class and I am set!  So excited.  The kids will be eager to find out why I have this (even got the old brown banana from last week's lunch), and I put it all on one of my blue science trays. 
My science lesson doesn't start until 9, so I just left it on the table.

No problem.

me-  "Y'all look at this!"
class- they look... at my hands holding the decaying leaves

   AND THEN A TINY, BLACK LIZARD LEAPS FROM HAND, ON TO THE TABLE, ACROSS THE FLOOR, UNDER THEIR CHAIRS

side note:  kids are now standing on their chairs, a few shrieking girls, "I'll get it, I'll get it" from the boys, complete NOW WHAT?  in my brain, and I decide we will let it stay.

me- "Let's keep the lizard.  He can eat all the bugs we've been seeing.  The bugs are probably from the candy you keep bringing in."
class-  "KEEP IT?!?!?"
me- "Sure.  Lizards don't bite."

hmm---I want them to watch part of Magic School Bus Meets the Rot Squad...in the dark...this won't work.

Plan B-
me- "Morris, please catch the lizard."
Morris- "OK!!!!!!!"

COMPLETE CHAOS for 2 minutes

He hands me the lizard.  I, of course, drop it.

Second round of chaos...

He hands it to me AGAIN.

They all sit down in shock that I'm holding a lizard. 
me-"What are some adaptations of a lizard?"  - got to keep it standards based, lol
class-"EWWW!    Can we touch it?   I don't want to.  I do.  You're scared of lizards!"  and the taunting begins.
me-  "I'll put him outside, or you can tell me some adaptations and I'll bring him around."
class- "They camouflage.  They have sticky feet.  They fly!" ????  We'll need to work on this.

And this is the moment the door opens... and in walks the... PRINCIPAL!!!!

principal-  "Are you holding a leaf?"
class- spontaneous laughter
me- "No, it's a lizard.  We're just talking about animal adaptations.  Conner, can you tell Mrs. C. about how a lizard can....."

YEP!  GREAT DAY!!!!


End of the day.... A sweet, little girl comes to me and says, "You know, Mrs. Purvis, you're just like Ms. Frizzle."  :)

Wednesday, December 5, 2012

How does thermal energy move? EXPERIMENT!

Wow!  My kids are loving the unit on magnets!  I'm starting to mix in a few thermal energy experiments as well.  I've got a super easy one!  This teaches the kids that there are smaller particles within the water and their movement correlates to their temperature.

First,  put a clear glass (I use my science beakers) of water in the refrigerator or add some ice and let it melt.
Second, boil some water and put in another glass that is the same shape/size.

When you slip a drop of food coloring in each one, they will disperse at different speeds.  The students can visually recognize that the hot water's particles are zooming around, while the colder particles are slowly drifting to the bottom- or as one student said today, "cold is like old people!".  I bet she'll never forget which moves fast and which moves slow!  Try it!

Monday, December 3, 2012

How to make a temporary magnet

I love teaching science!  This week my third graders are working on magnetic fields and temporary magnets.  Temporary magnets make a low budget and easy experiment that just amazes the students.
First, I put the following vocabulary words on the board so that we can reference them throughout the lesson.  I like to be able to point to the word as I'm saying it to catch those visual learners.  :)
temporary magnet, permanent magnet, stroke, pole, nail, magnetize
Second, I show them this picture:


We discuss how the magnetic domains would turn when they get heated and cooled (linking it to their prior knowledge).
I extend this to discuss how we want the poles to be lined up in an orderly fashion, like those inside a magnet.
Third, I show them a nail and we discuss how it is attracted to a magnet, but it is not a magnet.

On to the experiment!
I model first and have them do it on their own at the end.
Hold the nail in one hand and pull the magnet down it with the other.
Repeat this several times.

The more strokes you make, the better the poles will align and the better the temporary magnet will work.
I click the stapler a few times to get some used staples out, and then I place my nail on the staples and TADAAA!

It's easy to get a clump of them to attract.  I challenge my students to try to link the staples end to end and see how strong they've made their temporary magnet.  In a few short seconds, they realize that more strokes will make their magnet stronger and a they will be busy stroking for awhile!